Kognitro Text iMage RPG Maker MZ Plugin
A downloadable plugin
Introduction
This plugin allows you to display text with custom fonts, or images with fade and fade out effects. Text and images can be anchored to specific areas of the screen. The plugin includes percentage and dynamic scaling.
A key reason for the plugin’s creation was because I wanted to use a plugin to allow the player to change screen resolution directly within the game. This created a lot of complexity when trying to make text or images scale so that they appeared the same way, regardless of the selected resolution.
The specific plugin I’m using myself is this one by Lanzy:
LZ Plugin
Features
- Display text or images with fade in / out effects.
- Display text with custom fonts, specifying the text color.
- Display images with scaling.
- Anchor text or images to specific points on the screen, with offsets.
Screenshots
Screenshots to follow shortly.
How to Use
Copying files
Copy the KOG_TextMage.js plugin file into your projects plugin folder at /js/plugins
Copy custom fonts you wish to use into your projects fonts folder. Both .TTF and .WOFF are supported.
Copy images you wish to use into your pictures folder at /img/pictures.
Plugin Setup
Use the plugin manager to add the plugin ‘KOG_TextMage’ to your projects list of plugins and switch it ON.
Custom Fonts
To use custom fonts, you need to specify which fonts from the /fonts folder you wish to use.
For each custom font, you need to indicate the full file name of the font, as well as give it a reference name. The reference name allows you to use a simplified name for the font when calling commands, while still keeping the original name of the font file.
This is done by double clicking the plugin, in the plugin list, then double clicking ‘Custom Fonts’ from the list of Parameters on the right:
You can then start to add custom fonts: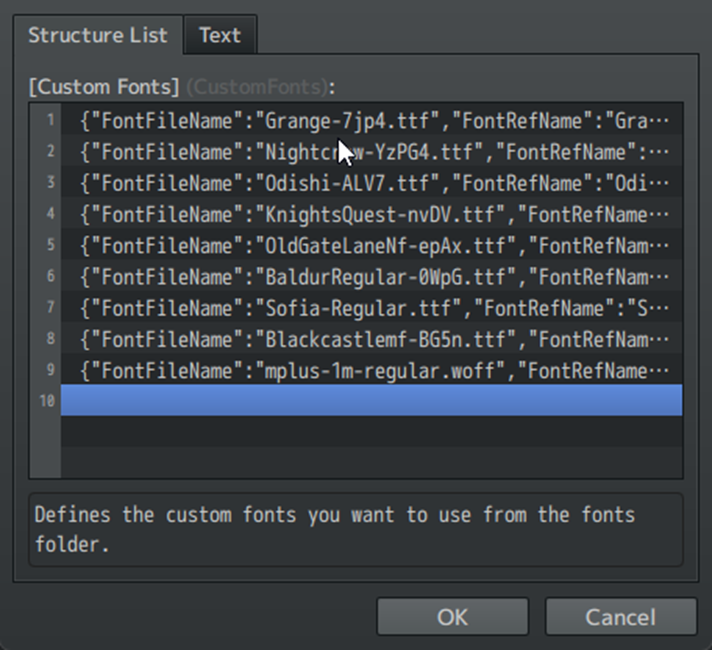
Anchor Points
The plugins anchor points let you place text/images in specific locations on the screen. If the resolution of the screen changes, your text/image will automatically be moved without having to manually calculate the pixel position. The diagram below details the available anchor points: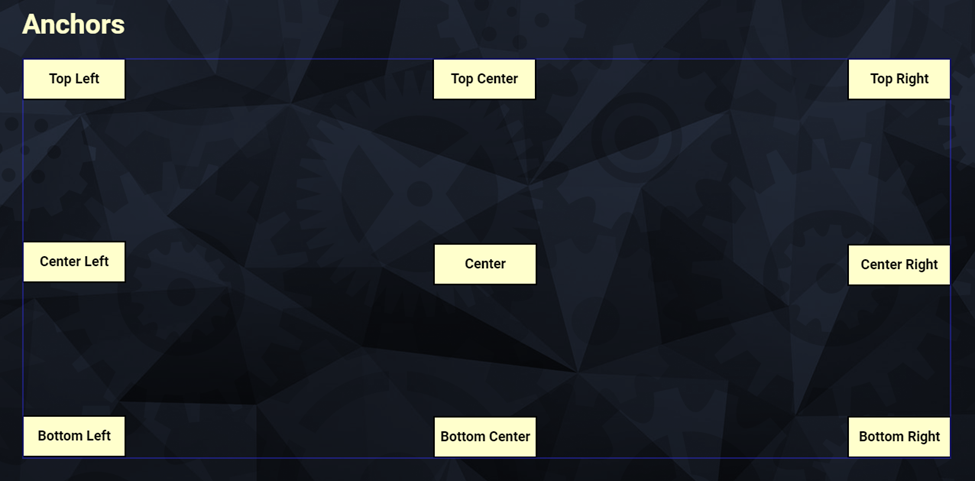
Anchor Offsets
Anchor offsets allow you to move the text/image away from the anchor point. This uses the plugin command arguments X_Offset and Y_Offset. For example, you can anchor text to the bottom right but move the text up and to the left to move it away from the edge of the screen.
Anchor Offset Style
The plugin supports two different styles of anchor offset that apply to the entire plugin. It is important to understand and decide which Anchor Offset Style you prefer before you begin using the plugin.
The Anchor Offset Style is set in the plugin settings: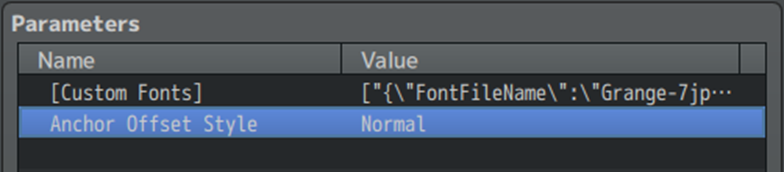
Pick between Normal Style or Margin Style for the Anchor Offset: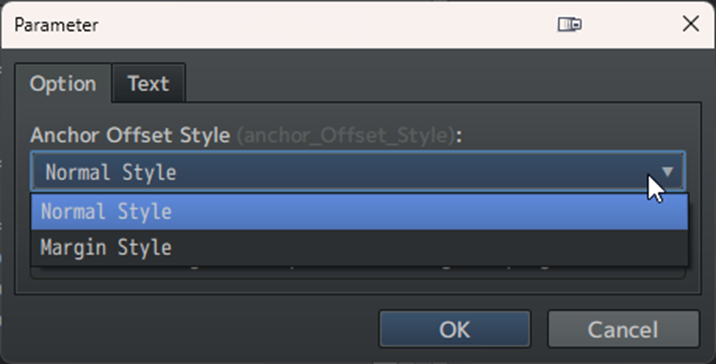
Anchor Offset Style – Normal
With Normal anchor offset style:
A negative X_Offset will move the text/image left.
A positive X_Offset will move the text/image right.
A negative Y_Offset will move the text/image up
A positive Y_Offset will move the text/image down.
You can see this in the diagram below:
Anchor Offset Style – Margin
When set to margin style, the anchors on the edge of the screen act like margins. When in this style, a positive number for X_Offset or Y_Offset moves the text/image away from the screens edge, towards the middle of the screen. Effectively this behaves like a margin.
The better understood by looking at the diagram below: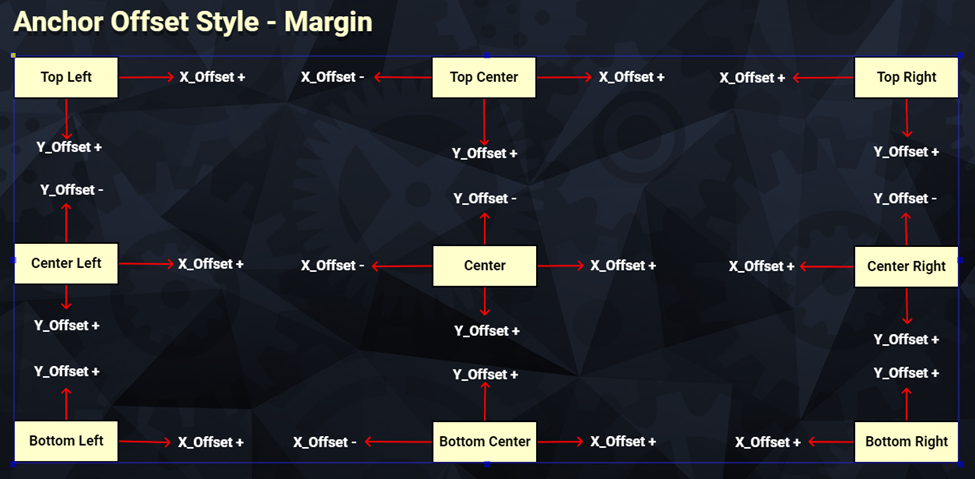
This style exists because typically you want to move text/images away from the screen edge, rather than off the edge of the screen. You can still move text/images off the edges of the screen, you would just need to provide negative values. Only use this style if you find this approach intuitive. If you find it confusing use the Normal style.
As you can see, if you decided to change the style later, all of your X_Offset and Y_Offset values in your plugin commands would need adjusting. This is why making this decision first is important.
Pixels or Percentages
You can specify a pixel or percentage value for the following arguments:
- X_Offset
- Y_Offset
- Image_width
- Image_height
For X_Offset and Image_Width percentages are based on the width of the game window.
For Y_Offset and Image_Height percentages are based on the height of the game window.
For the above arguments simply add a percentage symbol after the number, to make the plugin use percentage-based sizing.
Percentages are useful if you are planning to use a plugin that allows the user to adjust the screen resolution dynamically. They also allow you to change your mind on what screen resolution to use without having to make changes to the Plugin command arguments. With percentages your text and images will appear in the same screen location regardless of resolution without the need for complex calculations.
Font Size Measurement
Fonts sizing is complex. Unfortunately, two fonts that are the same font size can have radically different sizes in terms of how big text will actually look.
Because of this, the plugin doesn’t support percentage-based scaling.
However, the plug does have a way of allowing you to display text on the screen that will appear approximately the same size regardless of resolution.
The ‘Show Text’ Plugin command has an option called ‘Font Size Measurement’.
When ‘Font Size Measurement’ is set to ‘Normal’ the ‘Font Size’ you have selected will display fonts using RPG Maker MZs built-in sizing.
If you switch to ‘Dynamic Scaling’ the ‘font Size’ number will display text at about the same size regardless of resolution.
Unfortunately, I cannot detail what to set ‘font-size’ to in this case, as it is highly dependent on the custom font you are using.
The calculation is based on using the RMMZ built in font ‘mplus-1m-regular.woff’. With this font at a resolution of 816x624, and the ‘font-size’ set to ‘100’ the phrase ‘the quick brown fox jumps over the lazy dog’ will fill 100% of the screen width. That phrase uses all 26 lower case alphabetic characters.
As general guide, when starting out with a new font, I’d recommend starting with smaller numbers for ‘font-size’ such as ‘20’. Once you get a feel for how big the text looks, you can adjust ‘font-size’ until it is the size you want. In some cases, you will need to set ‘font-size’ to well above the ‘100’ mark.
When using dynamic scaling, you should test the text display on each resolution you are planning to provide. You might find you need to reduce the ‘font-size’ so that it appears okay on every resolution.
Images - Zero image width / height
The plugin has a set of special behaviors when displaying images, and specifying zero values for Image_width and image_height. These are designed to make rendering images using proportional scaling easier.
The behaviors are detailed below:
- If both Image_width and image_height are set to zero, the image will be rendered using its original dimensions. AKA no scaling will occur.
- If image_height has a positive number specified, but image_width is set to zero, then the image width will be scaled proportionally to the image’s original dimensions.
- If image_width has a positive number specified, but image_height is zero, then the image height will be scaled proportionally to the image’s original dimensions.
As an example : Say you have an image file that is 300px width and 40 px height.
Setting image_height to 200px and image_width to zero, the width of the image will automatically be scaled in proportion. Since the image is being rendered at half its original height, the width will also be half its original height, so 150px.
You can also utilize percentages with zero width or height.
As an example: Imagine you have a set of character images that you always want displayed at 25% of the game window. All of these images have slightly different widths. To do this, set image_height to 25%, and image_width to zero. Now all the character images will be rendered correctly without getting warped out of shape.
General image scaling recommendations
This section isn’t specific to this plugin but is general advice on scaling images working with different resolutions. Typically, it is advised to scale images down rather than scale them up. The problem with up-scaling is that a small image will look fuzzy when enlarged. It is recommended to create an image for your largest screen resolution and then scale it down using percentages for lower resolutions.
Limitations / Issues
When displaying text, it’s actually a bitmap image that is used, and the text drawn onto it. When displaying text, the text cannot be bigger than the screens width and height. If it is, you will see an error saying: ERROR: Text Can’t be wider than screen.
At the moment the plugin does not support adding an outline (border) to your text. This is a feature I am working on, and will likely become available at a later time.
This is an early release, and I believe I may have a minor memory leak issue. However, you would have to display text or images many thousands of times before this would cause any significant issue.
Plugin Commands
Plugin Command - Show Text
Show text on the screen, anchored to a specific location.
Arguments:
Text
The text to displayed on the screen.
Font Reference Name
The font reference name for the font to be displayed. Set this to the reference name you set in the plugins ‘Custom Fonts’ parameter. If you want to use the font specified as the ‘Main Font filename’ in the database (under the system 2 tab) enter ‘rmmz-mainfont’ without the quotes.
Font Size
The size of the font. The actual size will depend on the ‘Font Size measurement’ argument.
Font Size Measurement
Sets if the font should use normal font sizes, or dynamically scaled. See the ‘Font Size Measurement’ section of this post for more details.
Anchor
Anchor point, where on the screen the text will be anchored. See the ‘Anchor Points’ section of this post for more details.
X Offset
Moves the text left or right away from the anchor point. See the ‘Anchor Offsets’ section of this post for more details.
Y Offset
Moves the text up or down away from the anchor point. See the ‘Anchor Offsets’ section of this post for more details.
Color
The color of the text as a Hex value. For example, #FF0000 for a bright red color. You can use an online color picker such as:
https://htmlcolorcodes.com/color-picker/
Display Duration
How long in milliseconds the text will stay on the screen. A value of 5000 will display the text for five seconds.
Fade in Duration
How long in milliseconds the text will take to fade in. Set a value of zero to make the text appear immediately.
Fade out Duration
How long in milliseconds the text will take to fade out. Set a value of zero to make the text disappear immediately after the display duration has ended.
Plugin Command - Show Image
Show an image on the screen, anchored to a specific location.
Arguments:
Image Name
The PNG format image from the /img/pictures folder to be displayed.
Anchor
Anchor point, where on the screen the image will be anchored. See the ‘Anchor Points’ section of this post for more details.
X Offset
Moves the image left or right away from the anchor point. See the ‘Anchor Offsets’ section of this post for more details.
Y Offset
Moves the image up or down away from the anchor point. See the ‘Anchor Offsets’ section of this post for more details.
Image Width
The width of the image in pixels, or as a percentage of the screen width (use percentage symbol)
Image Height
The height of the image in pixels, or as a percentage of the screen height (use percentage symbol)
Display Duration
How long in milliseconds the image will stay on the screen. A value of 5000 will display the image for five seconds.
Fade in Duration
How long in milliseconds the image will take to fade in. Set a value of zero to make the image appear immediately.
Fade out Duration
How long in milliseconds the image will take to fade out. Set a value of zero to make the image disappear immediately after the display duration has ended.
Script Calls
Script calls are not yet supported, but this will be added in the near future.
Demo
I want to get the plugin out, but will create a demo project when I get the chance.
Bugs/Issues
Despite my best efforts, those pesky bugs get into my code on a reasonably frequent basis. If you find bugs or are having issues, post them here. I will do my best to respond when I get a chance. Due to my busy life, it may be several days before I can respond to new queries.
Feature Requests
Ideas and feature suggestions are welcome. However, I have a full-time job, a family, and a busy schedule. I created this plugin primarily for my own purposes and I cannot guarantee that any given feature will be implemented.
Terms and Credits
Terms
This section details how you may use the plugin:
- You may use this plugin for both personal and commercial RMMZ game projects.
- You are free to modify this plugin. I cannot provide support for modified versions.
- Do not attempt to sell this plugin.
- Do not claim the plugin as your own work.
- Use for Adult content is acceptable.
Do not repost it here or elsewhere without permission. This includes posting modified versions of the plugin. If you have made improvements and want to release them, please contact me for review. I will consider incorporating your changes. I would add you to the Credits section in this case.
This plugin comes without guarantees of any kind. If the plugin becomes self-aware and goes on an uncontrolled rampage through your neighborhood looking for people called Sarah, I will not be held responsible.
Credits
Copyright Kognitro Games 2024.
Thanks to Sang Hendrix for providing the basic idea for this plugin:
Sang Hendrix
Credit to caethyril for help when I was graphically challenged:
caethyril
Download
Click download now to get access to the following files:
Comments
Log in with itch.io to leave a comment.
Thanks a lot, I thought I would never be able to fade texts without images. You saved my life there!